DIY Oyster Shell Dishes
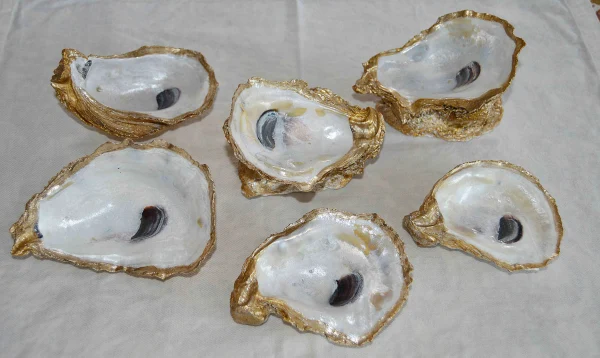
Living in New Orleans, the seafood is plentiful so every year my husband and I get a box of 100 oysters and host an oyster shucking party. After a few times, I realized that I could be making some nifty crafts with the leftover oyster shells. A friend of mine bought me a hand-painted oyster jewelry dish so that was my inspiration for these oyster shell dishes. You can use them as catch-alls, jewelry dishes for your rings or small jewelry, or even as a soap dish near your sink.
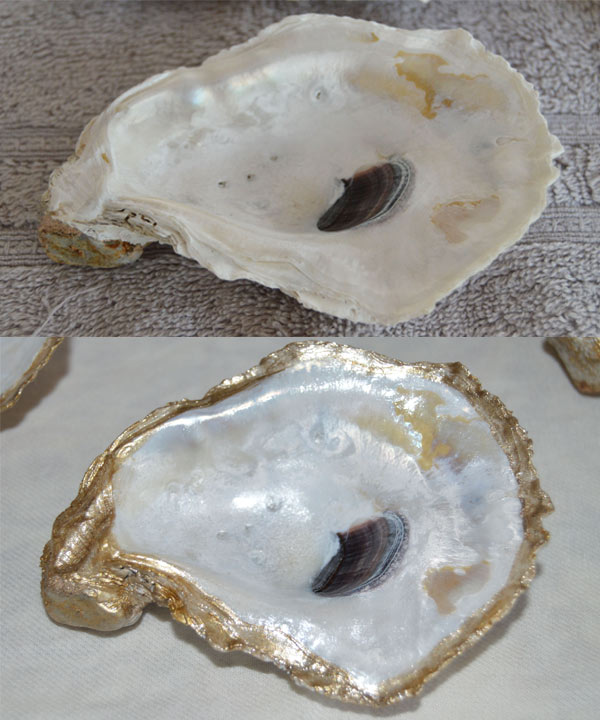
Check out the before and after below:

The most difficult part of making these oyster shell dishes is cleaning the freshly soaked oysters. I did a lot of research online to ensure that my oyster shells would not smell and I came up with a very good method for getting the shells completely clean.
Here are the steps to properly clean the oysters to prep them for painting. You will want to do this outside:
- Soak freshly shucked oyster shells in half water, half bleach solution for up to 24 hours. I was cleaning a lot of shells so I used a large bucket but you could use anything that will fully submerge your shells in water and that you don’t mind getting dirty/smelling like seafood.
- Dump out the bleach solution and refill with a warm water and dish soap solution for cleaning.
- Wearing protective gloves like rubber dish gloves to protect your hand from the smell and wear, take a hard bristled nail brush or toothbrush and scrub off any excess dirt and membranes from each shell. Every oyster has a joint that connects the 2 shells and you need to get rid of this completely before crafting. If the toothbrush isn’t working you can use an exacto knife or something hard to scrape it off. I just used my nails and the toothbrush. Place the clean shells outside of the bucket
- Once you have cleaned the shells, dump the dish soap solution and refill with a solution of half white vinegar and half water. Place the cleaned shells back in the bucket and let them sit for up to 3 hours.
- Using a nail brush, or small scrub brush, scrub each shell them rinse under water and lay our to dry. This will remove all of the excess black and dirt on the outside of the shell.
- Lay out the shells on a clean, dry surface and let dry
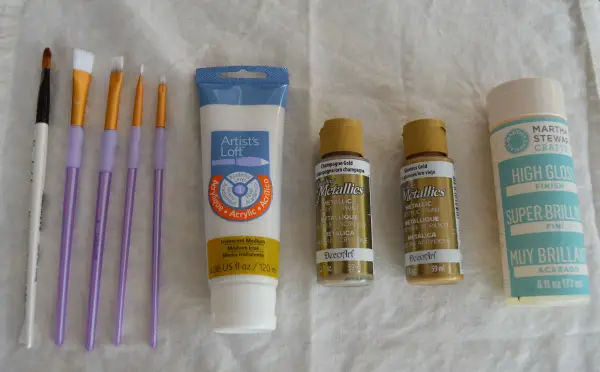
The hardest part is over. Now your shells are ready to paint. See the photo below, but here is what you will need:
- Different size paint brushes
- Iridescent acrylic paint
- Gold and silver acrylic paints
- Clear High gloss finish or glossing paint
I started with the iridescent paint to the far left first and coated the entire shell with a thin layer but very lightly went over the dark joint area. I let this dry. Next, I took one of the thin paint brushes and a gold paint and outlined the edges of the the inside of the shell. There are grooves on around the inner shell so it helps you follow a line. I used both hues of gold and would layer them until I liked the look.
I then took a larger brush and lightly brushed the different golds on the back of the shell to give it some texture. You can play with this and cover the crevices completely or leave it looking distressed.
Once the gold paint had dried, I went over the shells with the high gloss finish on the right to seal the paint in.
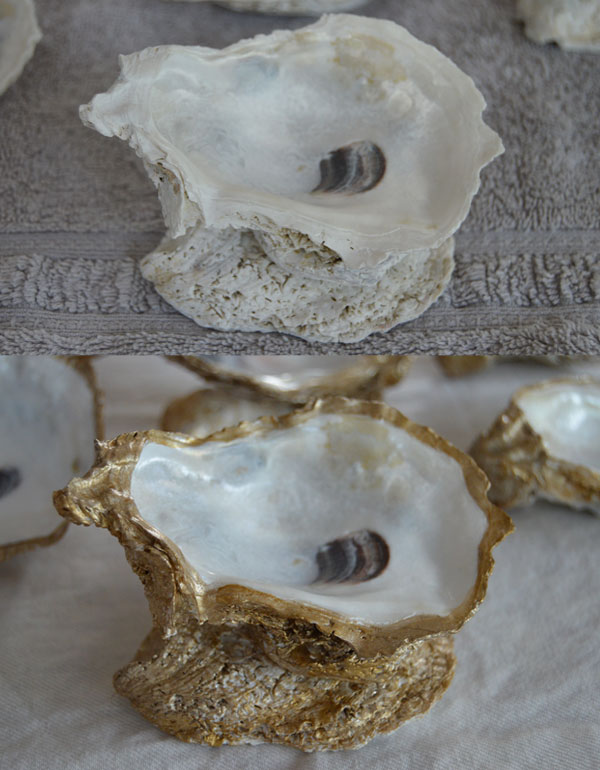
For some dishes, I took another oyster shell and flipped it and hot glued them together to create a stand. See the example below. For others like the example above, they worked better sitting on their own.
Before and after of oyster dish with stand
Stay tuned for my oyster shell mirror!


Very neat. These would make great gifts! Awesome idea. Have a great rest of your week! 🙂
LikeLike
So clever!
LikeLike
Can you mix the iridescent medium with a color for the inside? Thank you for the information! Can’t wait to try!
LikeLike
Hi Connie! You could mix the iridescent with a color but I chose not to because I didn’t want to lose the beautiful coloring of the joint. It may also not make the edges as prominent. But I say test a few and see how they look!
LikeLike
Hi, was wondering about an online site I can order these supplies for the oysters? I live in a very rule area. Thanks, Karen
LikeLike
Hi Karen,
I’m sure you can order most of the supplies in this post on http://www.michaels.com/ and even some on http://www.homedepot.com/. You would have to search the web for where to order used oyster shells. I buy them live, eat them and then save the shells.
LikeLike
These are awesome!! They are so perfectly done and your tutorial is so clear. Have you started selling them? i need 4 for a photo shoot next week(5/20) and don’t have time to make them! Let me know,, if not, I don’t eat oysters, what type of oyster did you use for these?
LikeLike
Thank Amy. I do not sell them at the moment because I have 2 small babies at home but would be willing to make them and sell them in the future if given advance notice. I used Gulf oysters for these as I live in New Orleans and they are very easy to get.
LikeLike
Is the silver optional? Thanks for the tips! Your shells are stunning ~
LikeLike
Thanks Dona. The silver is definitely optional. You could do just gold and I’ve done some with just the white iridescent and you can still see the natural border of the shell.
LikeLike
Hello, this is awesome – love it. Can I ask, the shine on the inside, is that just from using the Iridescent acrylic paint?
LikeLike
Thanks Tabitha. Yes it is just white, iridescent paint. I got it at Michaels.
LikeLike
Thank you very much for such detailed explanation, its it’s very useful
LikeLike
Where in New Orleans did you get your shells? I am going to try Cooter Brown’s.
LikeLike
I go to Harbor Oyster and Seafood in Kenner and buy fresh oysters and we eat them and save the shells. I’m sure there are places like Cooter Browns that will give you the shells.
LikeLike
Hi there! What is the ‘dark joint area’? Are you referring to the black spot on the inside of the shell, or the edge where the hinge would be.
LikeLike
The edge where the hinge would be. You need to fully remove this.
LikeLike