Halloween Decoration Inspiration

I LOVE Halloween! I may even like it more than Christmas because I love decorating for it and costuming. I’ve been accumulating indoor and outdoor decorations for years and thought you would enjoy some pics of my “spooky” pad to garner your own inspiration. My indoor decor game is probably stronger than outdoor because I lived in apartments for so many years. But now that I have my own house, I’ve been stepping up my outdoor decor.
Halloween Window Decals

This year, I found these really easy and cheap Halloween window decals from Party City. You just get double-sided tape and stick them on the interior of your windows. When you turn on a light in the room, they glow and show the silhouettes on the exterior.
Front Porch Halloween Decorations

Front Yard Cemetery and Bones

Mercury, Black and Silver Table Scape

Haunted Buffet

Spiders and Cob Webs on Fireplace

Lemon Icebox Pie

So, I had a baby girl almost 7 months ago and the poor blog has gone by the waste side, again. However, I have not stopped cooking, crafting and decorating and now I’ve even acquired some new skills such as baby food-making! More to come on recipes for baby food.
Back in the spring, our good friends Ryan and Jessica Legaux came to visit and spoiled us with their amazing cooking. They have owned and operated the Creole restaurant, Harold and Belle’s, in Los Angeles. For 3 generations and over 47 years Harold and Belle’s has become a fixture in the Jefferson Park community. They recently did a remodel of the restaurant and it looks better than ever, so if you are ever in the L.A. area and looking for something unique or simply craving true New Orleans-style food, I highly recommend it.
Ryan is such a great cook and can truly whip anything up out of anything. Remember the Crab Stuffed Mirlitons I posted years ago? Those were his! And he’s back as my guest cook with this decadent Lemon Ice Box Pie.
Lemon Ice Box pie is a simple pie recipe that earns it’s name because it requires refrigeration to set and Ryan kicks his up with a Nilla Wafer crust and a meringue topping that he peaks and then bakes in the oven to create a light and almost crispy texture on top of the pie. The layers of airy meringue, the tart lemon custard filling and a butter cookie crust make for a divine summer or spring dessert!

Recipe:
Cook time – 20 min.
Time to set before serving – 6 hours
- 1 1/4 cup crushed vanilla wafers
- 1/4 cup of butter (1/2 of a stick), melted
- 3 Eggs, brought to room temperature and separated
- 1 can (14 oz.) sweetened condensed milk
- 1/3 cup fresh lemon juice
- 1/2 tsp lemon zest
- 1/4 tsp cream of tartar
- 1/2 tsp vanilla
- Sugar to taste
For the crust
Pulse vanilla wafers in a food processor or crush by hand until they are the consistency of course sand. Some large chunks are ok. Mix the melted butter with the crushed wafters until blended. Press into the bottom of a greased pie pan or 6X8 serving dish.
For the Filling
Separate the egg yolks in a large mixing bowl and save the egg whites in a separate mixing bowl for the meringue. Add the sweetened condensed milk, lemon juice and lemon zest to the egg yolks and mix with a fork or whisk. Pour mixture over the pie crust.
For the Meringue
With a hand or stand mixer, whisk the egg whites, cream a tartar, vanilla and 2-3 tablespoons of sugar to taste. You can add more or less sugar to your liking. Beat until it’s fluffy and forms peaks on the mixer attachments. Layer the meringue on top of the custard mixture . Smooth out with a spatula and then form peaks by taking a regular teaspoon and placing it on the topping and pulling it straight up. See the photo above for guidance.
Bake the pie for 20 min at 350 degrees until the meringue is golden brown. Let sit in the refrigerator for at least 6 hours.
DIY Oyster Shell Dishes

Living in New Orleans, the seafood is plentiful so every year my husband and I get a box of 100 oysters and host an oyster shucking party. After a few times, I realized that I could be making some nifty crafts with the leftover oyster shells. A friend of mine bought me a hand-painted oyster jewelry dish so that was my inspiration for these oyster shell dishes. You can use them as catch-alls, jewelry dishes for your rings or small jewelry, or even as a soap dish near your sink.
Check out the before and after below:
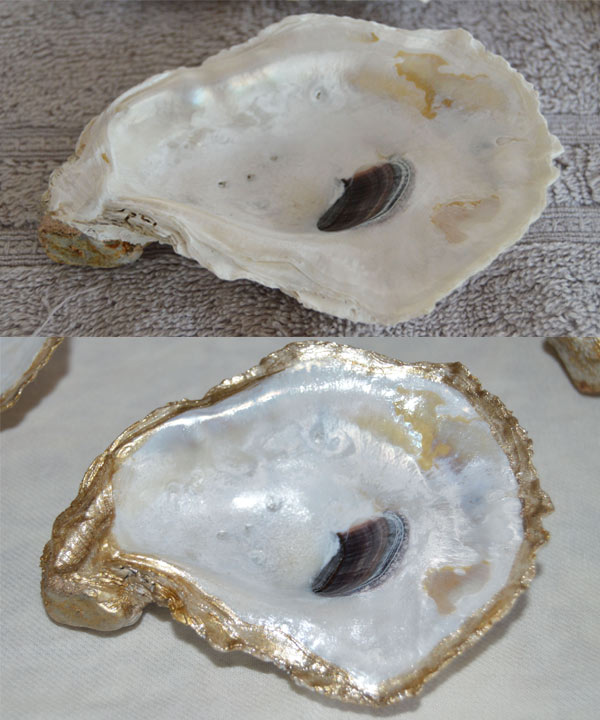

The most difficult part of making these oyster shell dishes is cleaning the freshly soaked oysters. I did a lot of research online to ensure that my oyster shells would not smell and I came up with a very good method for getting the shells completely clean.
Here are the steps to properly clean the oysters to prep them for painting. You will want to do this outside:
- Soak freshly shucked oyster shells in half water, half bleach solution for up to 24 hours. I was cleaning a lot of shells so I used a large bucket but you could use anything that will fully submerge your shells in water and that you don’t mind getting dirty/smelling like seafood.
- Dump out the bleach solution and refill with a warm water and dish soap solution for cleaning.
- Wearing protective gloves like rubber dish gloves to protect your hand from the smell and wear, take a hard bristled nail brush or toothbrush and scrub off any excess dirt and membranes from each shell. Every oyster has a joint that connects the 2 shells and you need to get rid of this completely before crafting. If the toothbrush isn’t working you can use an exacto knife or something hard to scrape it off. I just used my nails and the toothbrush. Place the clean shells outside of the bucket
- Once you have cleaned the shells, dump the dish soap solution and refill with a solution of half white vinegar and half water. Place the cleaned shells back in the bucket and let them sit for up to 3 hours.
- Using a nail brush, or small scrub brush, scrub each shell them rinse under water and lay our to dry. This will remove all of the excess black and dirt on the outside of the shell.
- Lay out the shells on a clean, dry surface and let dry
The hardest part is over. Now your shells are ready to paint. See the photo below, but here is what you will need:
- Different size paint brushes
- Iridescent acrylic paint
- Gold and silver acrylic paints
- Clear High gloss finish or glossing paint

I started with the iridescent paint to the far left first and coated the entire shell with a thin layer but very lightly went over the dark joint area. I let this dry. Next, I took one of the thin paint brushes and a gold paint and outlined the edges of the the inside of the shell. There are grooves on around the inner shell so it helps you follow a line. I used both hues of gold and would layer them until I liked the look.
I then took a larger brush and lightly brushed the different golds on the back of the shell to give it some texture. You can play with this and cover the crevices completely or leave it looking distressed.
Once the gold paint had dried, I went over the shells with the high gloss finish on the right to seal the paint in.
For some dishes, I took another oyster shell and flipped it and hot glued them together to create a stand. See the example below. For others like the example above, they worked better sitting on their own.
Before and after of oyster dish with stand

Stay tuned for my oyster shell mirror!
Easy Homemade Spicy Dill Pickles (No canning required!)


As summer comes to a close for most parts of the U.S., here in New Orleans it’s still hot and humid. However, my summer garden is starting to reach the end of it’s life. That means making use of my incredible cucumber harvest! This year it seemed liked my cucumbers were on steroids, some growing longer than my Macbook (see photo below).


My husband is not fond of cucumbers but he loves pickles, and he loves all things spicy, so I decided to test out a new spicy dill pickle recipe to make use of my summer bounty. I found this recipe on Foodnetwork.com from Emeril. For the first batch I followed it exactly but the second round I used fresh habanero peppers and a few more of them in each jar and about 1/3 less sugar. They came out very spicy but those who can handle the heat loved them.
This recipe calls to use a canner and boil but you don’t have go through the canning process if you can refrigerate them and eat them within a few months or if you are like me and give most of them away to your friends. If you want to save some outside of the refrigerator and for a longer period, you will have to can them.
One other thing to note is that most recipes call for “pickling cucumbers” which are called Kirbies but I just used normal garden cucumbers and they turned out great. There we more seeds but little difference on the texture and crispness of the pickle.

Recipe:
- 5-6 large cucumbers , each between 6 and 8-inches long (If you can’t find them this large use 7-9 regular size cucumbers)
- 2 small bunches fresh dill
- 1 small yellow onion, peeled and thinly sliced
- 12 cloves garlic, peeled and crushed
- 6 dried small red chili peppers (use 2-4 more if you want them really hot)
- 1 1/2 teaspoons black peppercorns
- 3 cups water
- 3 cups apple cider vinegar
- 1/2 cup pickling salt
- 1/4 cup granulated sugar
Chill the cucumbers in ice water or in the refrigerator for over an hour.
Sterilize your mason jars and lids in a hot water bath according to the manufacturer’s instructions. Divide the dill, onions, garlic, peppers and peppercorns among the jars.
Slice the cucumbers leaving the skin on horizontally for chips or vertically for spears to fit your mason jars. I eyeballed this and did a few different types of jars. If you are doing spears, test one slice to fit the jar first to make sure they are all the right length before you cut them all. Tightly pack into the jars.
In a medium pot, combine the vinegar, water, salt, and sugar, and bring to a boil. Boil for 2 minutes to dissolve the salt and sugar.
Pour the hot liquid over the cucumbers, leaving a 1/2-inch of headspace at the top of each jar. Tap the jars on the counter to dispel any air bubbles, cover with lids and rings, and seal tightly. Let cool for 20-30 minutes.
Store in refrigerator for up to 3 months.
Creamy Cauliflower Soup

Cold weather means soup season and I jump at the chance to make a good, hearty soup. I found this recipe from the Pioneer Woman on the Food Network and it looked so good I had to give it a try.
The sauteed vegetables and cauliflower give the soup great depth and flavor and the cream sauce adds a richness but I lightened it up by using skim milk and cutting out the sour cream. Add some crackers, cheese and green onions and you have a fulfilling, hot meal!


Recipe:
- 1 stick butter
- 1/2 onion, finely diced
- 1 carrot, finely diced
- 1 celery stalk, finely diced
- 1 cauliflower head, cored and roughly chopped
- 2 tablespoons finely minced fresh parsley
- 8 cups low-sodium chicken broth or stock
- 6 tablespoons all-purpose flour
- 2 cups non-fat or skim milk
- 1 cup half-and-half
- 1 to 2 teaspoons salt (or to taste)
- Ground black pepper
Melt 1/2 stick of the butter in a heavy pot over medium heat. Then add the onions and cook until translucent, about 3 minutes. Add the carrots and celery, and then stir and cook for a couple more minutes. Throw in the cauliflower. Then stir it around, cover and cook over very low heat for 15 minutes.Add the parsley, and then add the chicken broth and simmer for 10 minutes.
Meanwhile, make a simple white sauce: Melt the remaining 1/2 stick butter in a medium saucepan over medium heat. Then whisk in the flour. Cook for a couple of minutes, and then pour in the milk, whisking to combine. Remove the white sauce from the heat and pour in the half-and-half. Then pour this creamy mixture into the pot.
Add 1 teaspoon salt and pepper to taste, and allow the soup to simmer for another 20 to 30 minutes. The soup will thicken slightly but shouldn’t be overly thick. Give it a taste and add more salt and pepper if needed.
Halloween Desserts
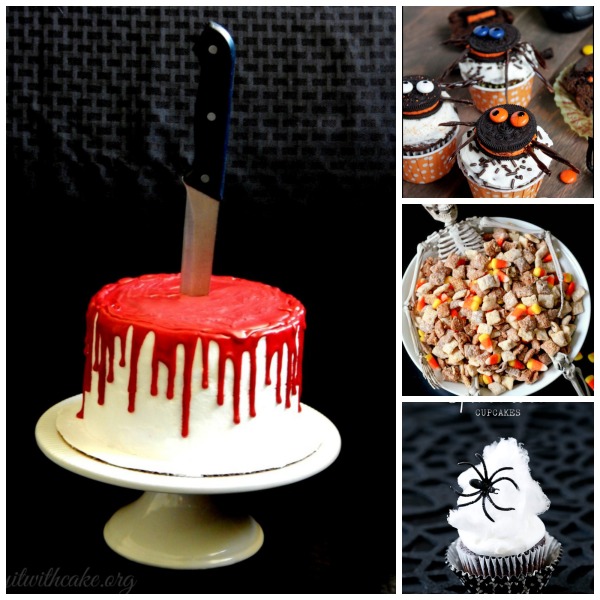
Halloween is my favorite holiday and I love looking for new ideas for festive recipes and food styling. These are just a few of the fun ideas I found on Pinterest this year from fellow bloggers. I’ve provided the links to each below. I hope this post gives you ideas and inspiration.
Bloody Halloween Cake from Say it With Cake

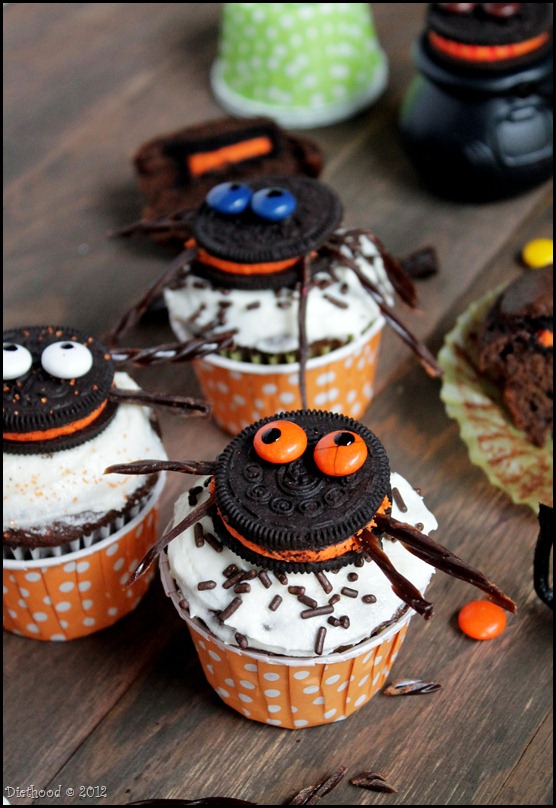
Spider Oreo Cupcakes from Diethood
Halloween Puppy Chow by Lil’ Luna

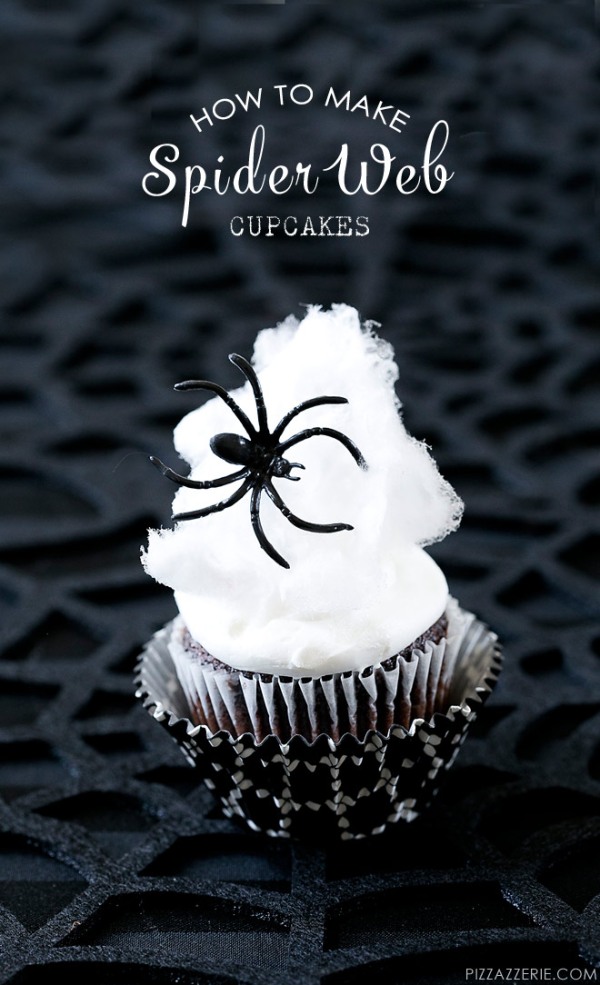
Spider Web Halloween Cupcakes from Pizzazzerie
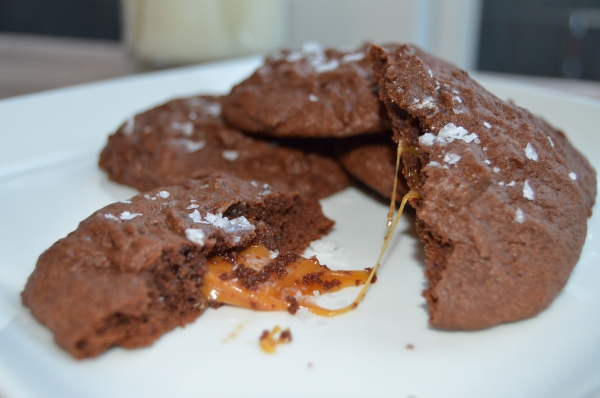
Chocolate Caramel Cookies with Maldon Salt – C2CCS #2
I’ll be honest, I’m not the most dedicated blogger. So when my cousin, blogger In Natalies Shoes, asked me to join the second Coast to Coast Cookie Swap (#C2CCS) I was 110% on board. Not only would I get free samples of freshly baked cookies sent to my home, but I would also get the opportunity to network with fellow food bloggers and share the Domestic Wannabe love.
So how it works is a group of 6 bloggers bake cookies and ship the cookies to 3 other bloggers in the group. Not a bad deal right?
I decided to make these Chocolate Caramel Cookies with Maldon Salt (similar to Fleur de Sel but not from the ocean) that a made for a baby shower a few weeks ago and were a huge hit. I found the recipe on Pinterest from Cooking Classy but I left out the powdered sugar and added more salt on top because I like a good burst of salt with my chocolate and caramel. 🙂

They sound complicated but they are very easy. The dough is similar to a brownie and you roll it into balls and then push a caramel candy in the middle. I cut mine in half because I wanted my cookies to be a little smaller and you need enough dough to wrap around the caramel. Once the caramel is inserted, sprinkle a dash of the salt on top and fold the dough around the caramel. Then sprinkle another dash of salt on top of the cookie and they are ready.

I love the combination of Chocolate and salt. Throw some caramel in there and I’m sold! These cookies are also great because they stay moist and you can reheat them in the microwave to ge the warm gooey out of the oven experience. I hope the ladies in the C2CCS enjoyed them!
Recipe:
- 1 1/2 cups all-purpose flour
- 1/2 cup + 2 Tbsp cocoa powder
- 1 1/2 tsp baking powder
- 1/4 tsp salt
- 10 tbsp salted butter, softened
- 1 cup granulated sugar
- 1/2 cup packed light-brown sugar
- 2 large eggs
- 1 1/2 tsp vanilla extract
- 2 dozen caramels (such as Kraft) or Rolos, unwrapped
- Maldon Salt
Preheat oven to 350 degrees. In a mixing bowl whisk together flour, cocoa powder, baking powder and salt, set aside. In the bowl of an electric stand mixer fit with a paddle attachment, whip together butter, granulated sugar and light-brown sugar on medium-high speed until pale and fluffy, about 4 minutes. Add in eggs one at a time, stirring after each addition until combine. Mix in vanilla. With mixer set on low speed, slowly add in dry ingredients and mix just until combine.
Scoop dough out 2 tbsp at a time and roll into a ball. Press one caramel into the center, sprinkle top of caramel with a small pinch of coarse sea salt then fold cookie dough around caramel and salt (make sure the caramel is fully covered with dough around all sides). Align cookies on Silpat lined or buttered cookie sheets and bake in preheated oven 11 – 13 minutes.
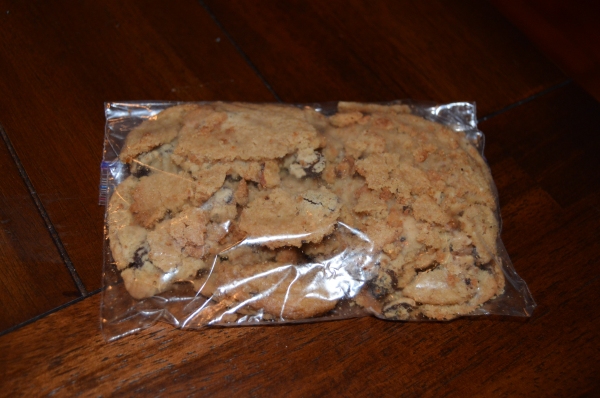
For the Cookie Swap, here’s what I received and got to nosh on this past week:
Karla’s Almond Joy Chocolate Chip Cookies
The didn’t hold up so well in the mail but they were delicious even in a million pieces. I loved the mixture of chocolate, nuts and coconut in the cookie and the dough was great too. My mom love’s Almond Joy candy bars so I know I will be making these for her soon!
Coco’s Cinnamon Appledoodles
These were great for fall and I loved the combination of the spicy cinnamon and apple jam.


Brown Sugar Oatmeal Cookies

Even though it’s still in the 90’s here in New Orleans, I love the fall and once summer ends, I can’t help but want to start cooking and baking my favorite comfort foods. That includes cookies – all kinds. I saw this recipe on an episode of The Pioneer Woman and it got me craving this classic cookie.

I normally take recipes that I find online or see on TV and modify them but I followed this one pretty much to a t (I used unsalted butter and 1/2 cups less oats) and it was perfect. It’s a new favorite at my office and some of my co-workers even said it was “The best oatmeal cookie they ever had.” Now that’s saying something.

The dark brown sugar gives the cookies a soft texture but they stay crispy on the bottom and edges. It also gives them a great sugary, vanilla flavor.

So kudos to the Pioneer Woman for this awesome recipe. It will definitely be a go-to for me whenever I’m in the mood for oatmeal cookies.

Recipe:
- 2 cups packed Dark Brown Sugar
- 1 cup (2 sticks) Butter, softened
- 2 tsp Vanilla extract
- 2 Eggs, room temperature
- 1 1/2 cups All Purpose Flour
- 1 tsp Salt
- 1/2 tsp Baking Soda
- 2 1/2 cups old fashioned Oats
Preheat the oven to 350 degrees F.
In the bowl of an electric mixer (or using a hand mixer), beat together the brown sugar and butter until fluffy. Beat in the vanilla. Add the eggs one at a time, scraping the bowl after each one.
Mix together the flour, salt and baking soda in a medium bowl. Add it into the creamed mixture in 2 to 3 batches, mixing until just combined. Mix in the oats until just combined.
Use your preferred size cookie scoop (or a regular spoon) to drop portions of dough onto baking sheets, spacing them a couple inches apart. Bake until dark and chewy, 12 to 13 minutes. If you’d like a crispier cookie, just cook a little longer!

Basil Pesto with Pine Nuts
It’s that time of year again and my garden is overflowing with basil! I love basil so I always plant a few varieties every spring so I will have plenty to work with all summer. For this pesto I used Sweet Basil which is the most common type you will find in the store and also my favorite. This is a very simple, classic recipe for basil pesto and it’s very versatile for all types of dishes. I love to use it as a sauce for pasta, grilled meats and spread it on bread to add to panini sandwiches.

As you can see, there is an abundance of basil in my garden. The darker green plant with the larger leaves is the Sweet Basil and the plant with the lighter colored leaves behind it with the darker stems is Cinnamon Basil. Both make great pestos using pine buts or walnuts but the Cinnamon Basil is also great in Thai dishes and stir frys.


I hope you get as much use out of this recipe in your dishes as I do. It’s a great go-to for pesto any time.
Recipe:
- 2 cups of freshly packed Basil
- 2 cloves of Garlic
- 1/2 cup of Pine Nuts
- 2/3-1 cup Olive Oil
- Salt and Pepper to taste
- 2/3 cups Pecorino Cheese
Combine the basil, garlic, and pine nuts and cheese in a food processor and pulse until coarsely chopped. Add the olive oil through the chute of the processor and process until fully incorporated and smooth. Season with salt and pepper and pulse a couple more times to incorporate.

Bow Tie Cupcakes and Cookies

A friend and colleague of mine is about to have a boy and she recently had a bow tie themed baby shower. She asked myself and our other colleague to bake cookies and cupcakes for the shower and we went all out. I made my famous chocolate cupcakes with buttercream frosting and golden yellow cupcakes with chocolate buttercream frosting.
I found free print outs on the Elli Blog, which is one of my new favorite blogs by the way, and I made bow ties to top the cupcakes. I also cut out fondant dots to add a variety of decorations and color that matched her invitation.

My colleague Christine is the queen of iced sugar cookies and she made these beautiful works of art below. Click here to get the recipe.


I will share this recipe again. It’s my go-to for any form of chocolate cake from sheet cake to cupcakes and I use it in a variety of ways. And, it’s so easy! For the Butter Golden I used the a box mix and made the chocolate buttercream frosting below and added 2/3 Cup of cocoa powder.
Chocolate Cupcake Recipe:
- 2 cups flour
- 2 cups sugar
- 1 tbsp baking soda
- 1/2 cup Cocoa
- Pinch of salt
- 1 cup vegetable or canola oil
- 1 cup buttermilk
- 2 beaten eggs
- 1 cup boiling water
This recipe can be mixed by hand or with a stand mixer with the whisk attachmentMix all dry ingredients together. Add the oil, buttermilk and eggs and mix well. Pour in the boiling water and mix until incorporated. The batter will be very thin. Bake at 350 degrees for 20 min or until a toothpick can be inserted and comes out clean.
Buttercream Frosting
- 1/2 cup butter
- 2/3 cup powdered sugar
- 3-4 tbsp milk
- 1/2 tsp vanilla extract
Cream butter, add sugar and milk in thirds. Add the vanilla in first round of milk and sugar.


